Features and Commands in Microsoft InfoPath 2010 Menus and Toolbars
The following tabs list all features and commands included in Classic Menu for InfoPath 2010 (it is part one of Classic Menu for Office 2010).
Main Menu of InfoPath 2010
These features included in v3.50, more features have been added in later versions.
- File
- Edit
- View
- Insert
- Foramt
- Tools
- Table
- Help
File
| Design a Form Template... | |
| Preview | Preview this form in InfoPath Filler to review how the form will look and function when published. |
| *** | |
| Open in Design Mode... | |
| Open | |
| From SharePoint List | Create a connection to import data from a SharePoint list. |
| Close | |
| *** | |
| Save | |
| Save As | |
| Export Source Files | |
| Submit Form | |
| To E-mail | Configure this form to submit data to an e-mail address or distribution list. |
| To SharePoint Library | Configure this form to submit data to a SharePoint library. |
| To Web Service | Configure this form template to submit data by using a Web service. |
| To SharePoint Server Connection | Configure this form to submit data by using a SharePoint Server connection. |
| Submit Options... | Manage the submit settings for this form or configure advanced submit capabilities. |
| Quick Publish | |
| External List | |
| Document Information Panel | |
| Publish to E-mail. | |
| Network Location | |
| SharePoint List | |
| SharePoint Server | |
| SharePoint Workspace | |
| Quick Publish | |
| Workflow | |
| *** | |
| Import Form... | |
| *** | |
| Page Setup... | Configure paper and page settings to use when the current view is printed. |
| Print Preview | |
| *** | |
| *** | |
| Open Recent File... | |
| *** | |
| Exit |
Edit
| Undo | |
| Redo | |
| *** | |
| Cut | Cut the selection and put it on the Clipboard. |
| Copy | Copy the selection and put it on the Clipboard. |
| Paste | Click here for more options such as pasting only the values or formatting. |
| Format Painter | Copy formatting from one place and apply it to another. -- -- Double-click this button to apply the same formatting to multiple places in the document. |
| *** | |
| Select All | Select all items. |
| *** | |
| Find... | Find text in the document. |
| Replace... | Replace text in the document. |
| *** | |
| Change Binding... | Bind this control to a different data field in this form. |
| Change Control | Convert this control into a different control type. |
View
| New View | Create a new view in this form template. -- -- Use views to organize the contents of the form that are seen at different times or by different users. |
| Delete Current | Delete the current view. -- -- Deleting the default view requires you to select a new default view. |
| *** | |
| Paragraph... | Show the Paragraph task pane. |
| *** | |
| Show Fields... | Show the Fields task pane. -- -- Use this task pane to view and manage the data fields for the entire form template. |
| *** | |
| Header & Footer... | Edit the Header or Footer of the document. -- -- The information in the Header or Footer will appear at the top or bottom of each printed page. |
| Print Width | Show the Page Width Guide to help format forms for printing. |
| View Gridlines | Turn on gridlines to which you can align objects in the document. |
| *** | |
| Properties | Show the View Properties dialog box to manage formatting and printing options for the current view. |
| Manage Views... | |
| Manage Rules... | Show the Rules task pane to manage existing rules for this control and to create new custom rules. |
Insert
| Layout Table... | |
| Horizontal Line | Insert a horizontal dividing line. |
| Insert Page Break | Start the next page at the current position when the form is printed. |
| Symbol... | Insert characters that are not on your keyboard, such as copyright symbols, trademark symbols, paragraph marks, and Unicode characters. |
| *** | |
| Clip Art... | Insert Clip Art into the document, including drawings, movies, sounds, or stock photography to illustrate a specific concept. |
| Picture... | Insert a picture from a file. |
| Hyperlink... | Create a link to a Web page, a picture, an e-mail address, or a program. |
| *** | |
| Controls | Select controls from this gallery to use in this form template. -- -- Use different control types to collect different kinds of data from users. |
| Controls Pane | Show the Controls task pane to insert more controls. |
| *** | |
| Add Rule | Validate form data, apply conditional formatting, switch views or set a field's value using rules. |
| Manage Rules... | Show the Rules task pane to manage existing rules for this control and to create new custom rules. |
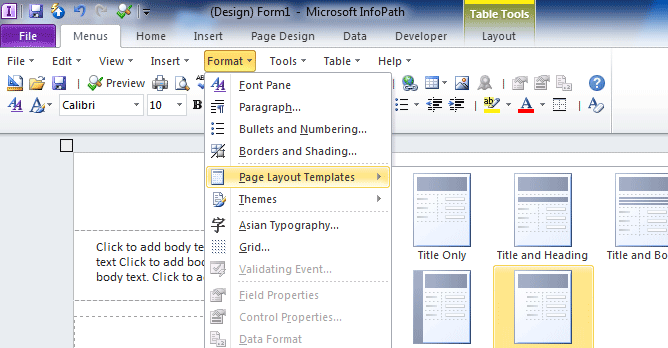
Format
| Font: | |
| Paragraph... | Show the Paragraph task pane. |
| Bullets and Numbering... | |
| Borders and Shading... | |
| *** | |
| Page Layout Templates | Insert table templates or custom tables into the current view of the form template. -- -- Use table templates to organize form contents and enable form template theming. |
| Themes | |
| *** | |
| Asian Typography... | |
| Grid... | Show the Grid task pane to specify how to layout Asian text. |
| On Validate Event... | Write code that runs when the data in the selected field is validated and before the change is committed. |
| *** | |
| Field Properties | Show the Field Properties dialog box to change advanced field properties. |
| Control Properties... | Show the Control Properties dialog box to change additional properties of this control. |
| Data Format | Select the format for data displayed in this control. |
| Shading | Color the background of the selected text, objects, or layout elements. |
| *** | |
| Clear Formatting | Reset formatting of the current selection back to default appearance. |
Tools
| Spelling | Click here to use the thesaurus, translation features, the Research Task Pane, and other proofing tools. |
| *** | |
| Default Values... | Edit the default state of the form when filled out. -- -- Specify default values for fields and how many of each repeating control to include in a new copy of this form. |
| Form Options | |
| Submit Options... | Manage the submit settings for this form or configure advanced submit capabilities. |
| Secondary Data Sources... | View and manage all data connections in the form template. |
| Refresh Fields | Show the data connection wizard to update or change the main data source for your form. |
| *** | |
| User Roles... | Define unique form behavior for different users or groups. -- -- User Roles can only be used in forms designed to be filled out using the InfoPath Filler. |
| Manage Resources | Select files to package with the form template that may be used as data sources or data connections. |
| Progr&amming | |
| On Load Event... | Write code that runs when the form is loaded. |
| On Switch Views Event... | Write code that runs when a new view is activated. |
| On Context Change Event... | Write code that runs when focus in the form is moved from one control to another, even if the contents of the first control are not changed. |
| On Sign Event... | Write code that runs when the form is signed. |
| *** | |
| On Before Change Event... | Write code that runs as soon as the contents of the selected field begin to be edited and before any changes to the data are committed. |
| On Validate Event... | Write code that runs when the data in the selected field is validated and before the change is committed. |
| On After Change Event... | Write code that runs after the contents of the selected field are changed and the change is committed. |
| *** | |
| Language | Select the programming language to use when writing code for this form. -- -- The programming language can only be changed before any code has been written. |
| Code Editor | Open Microsoft Visual Studio Tools for Applications to write or edit code in this form. |
| Microsoft InfoPath Developer Resources | |
| Design Checker | Show the Design Checker task pane. -- -- Use the Design Checker to check the form for compatibility errors and other warnings and to change the design mode of the form template. |
| Rule Inspector... | View the details of all rules in this form template. |
| *** | |
| Rules | |
| Form Load | Create rules that will run when the form is opened. |
| Form Submit | Create rules that run when the form is submitted. -- -- To enable setting rules for submitting the form, open the Submit Options dialog box, select the option for performing custom actions using rules, and then click OK. |
| Rule Inspector... | View the details of all rules in this form template. |
| COM Add-Ins... | Manage the available COM add-ins. |
| Get External Data | |
| From Web Service | Create a connection to import data by using a Web service. |
| From SharePoint List | Create a connection to import data from a SharePoint list. |
| From SharePoint Server | Create a connection to import data by using a SharePoint Server connection. |
| From Other Sources | Import data from other data sources. |
| Secondary Data Sources... | View and manage all data connections in the form template. |
| *** | |
| Signatures | Configure this section to accept digital signatures. |
| *** | |
| Trust Center... | |
| Options | |
Table
| Table | Insert or draw a table into the document. |
| Table | |
| Eraser | Erase the borders of a table. |
| *** | |
| In&sert | |
| *** | |
| Insert Left | Add a new column directly to the left of the selected column. |
| Insert Right | Add a new column directly to the right of the selected column. |
| *** | |
| Insert Above | Add a new row directly above the selected row. |
| Insert Below | Add a new row directly below the selected row. |
| Delete | Delete rows, columns, cells, or the entire table. |
| Select | Select the current cell, row, column, or entire table. |
| Merge Cells | Merge the selected cells into one cell. |
| Split Cells... | Split the selected cells into multiple new cells. |
| *** | |
| Borders and Shading... | |
| View Gridlines | Turn on gridlines to which you can align objects in the document. |
| *** | |
| Change To | Change the selected table into a Repeating Table control. |
| Table Properties... | Show the Table Properties dialog box to change advanced table properties, such as alignment and dimensions. |
Help
| Help | Get help using Microsoft Office. |
| Office.com | |
| Contact Us... | |
| *** | |
| Check for Updates | |
| Activate Product... | |
| Privacy Options... | |
| About |
Standard and Formatting Toolbars
- Standard Toolbar
- Formatting Toolbar
Standard Toolbar
| Design a Form Template... | |
| Open | |
| Open in Design Mode... | |
| Save | |
| | | |
| Preview | Preview this form in InfoPath Filler to review how the form will look and function when published. |
| Print Preview | |
| Spelling... | Check the spelling of text. |
| | | |
| Cut | Cut the selection and put it on the Clipboard. |
| Copy | Copy the selection and put it on the Clipboard. |
| Paste | Click here for more options such as pasting only the values or formatting. |
| Format Painter | Copy formatting from one place and apply it to another. -- -- Double-click this button to apply the same formatting to multiple places in the document. |
| | | |
| Undo | |
| Redo | |
| | | |
| Hyperlink... | Create a link to a Web page, a picture, an e-mail address, or a program. |
| Table | Insert or draw a table into the document. |
| Picture... | Insert a picture from a file. |
| Signatures | Configure this section to accept digital signatures. |
| | | |
| Field Properties | Show the Field Properties dialog box to change advanced field properties. |
| Control Properties... | Show the Control Properties dialog box to change additional properties of this control. |
| Data Format | Select the format for data displayed in this control. |
| Help | Get help using Microsoft Office. |
Formatting Toolbar
| Font Pane | |
| Quick Styles | Format titles and other text by using this gallery of styles. |
| Font: | Change the font face. |
| Font Size: | Change the font size. |
| Bold | Make the selected text bold. |
| Italic | Italicize the selected text. |
| Underline | Underline the selected text. |
| | | |
| Align Left | Align text to the left. |
| Center | Center text. |
| Align Right | Align text to the right. |
| Line spacing | Change the spacing between lines. |
| | | |
| Left-to-Right | Set the direction of text to be displayed from left to right. |
| Right-to-Left | Set the direction of text to be displayed from right to left. |
| Left-to-Right Document | Set the layout of the page as left-to-right. |
| Right-to-Left Document | Switch the sheet direction so that the first column is on the right side. |
| | | |
| Bullets | Start a bulleted list. -- -- Click the arrow to choose different bullet styles. |
| Decrease Indent | Decrease the indent level of the paragraph. |
| Increase Indent | Increase the indent level of the paragraph. |
| | | |
| Text Highlight Color | Make text look like it was marked with a highlighter pen. |
| Font Color | Change the text color. |
| Borders | Format the borders of the selected text, objects, or layout elements. |
| | | |
| Clear Formatting | Reset formatting of the current selection back to default appearance. |
| Home | |
| Insert | |
| Page Design | |
| Data | |
| Developer |
Classic Menu for Office
|
|